Window seals are critical for keeping your home comfortable, energy-efficient, and protected from weather and moisture. Damaged seals can lead to higher energy bills, drafts, and even structural issues like mold or wood rot. Here’s a quick summary of what you need to know:
- Signs of Seal Damage: Look for foggy windows, drafts, visible gaps, rising energy bills, or condensation between panes.
- Inspection Tools: Use a flashlight, candle, utility knife, or moisture meter to spot issues.
- DIY vs. Professional Help: Minor repairs cost $15–$17, while professional services range from $30–$50/hour. Call pros for complex windows, structural damage, or warranty concerns.
- Replacement Steps: Remove old seals, clean the area, install new seals, and inspect for gaps. Use materials like silicone for humid climates.
- Maintenance Tips: Inspect seals annually, clean regularly, and reapply caulk as needed.
Taking care of your window seals can save up to 30% on heating and cooling costs, improve indoor comfort, and prevent costly repairs. Whether you’re tackling a DIY project or hiring a pro, maintaining window seals is a smart investment for your home.
How to replace UPVC window seals to stop cold air draughts!
What Are Window Seals
Window seals are crucial components designed to keep air, water, and dust from entering through window frames. Their primary role is to maintain indoor comfort by keeping outdoor elements at bay.
In modern double- or triple-pane windows, these seals also play a key role in energy efficiency. They trap air or inert gases between glass panes, forming an insulating barrier that minimizes energy transfer. The material used for seals varies, with each offering specific benefits in terms of durability and application, which we’ll dive into shortly.
“Window seals keep these gases in your window, preventing air from leaking. These gases are heavier than air, slowing down the energy transfer between your home and the outdoors. Window seals can save you money on heating and cooling costs through increased energy efficiency.”
- Josh Ramsey, regional training manager at Renewal by Andersen Metro Energy & Midwest
Beyond simply keeping out drafts, properly functioning window seals can significantly lower energy bills, making them an essential part of any home.
Common Types of Window Seals
Window seals come in various forms, each designed to meet specific needs. Choosing the right type depends on factors like window usage, weather exposure, and your home’s requirements.
- Foam weather strips: These are a budget-friendly option that’s easy to install. They’re ideal for windows with light usage but may not last as long as other types.
- Vinyl weather strips: Known for their durability, these are a great choice for sliding windows and doors. Installation is moderately challenging, but their weather resistance makes them a favorite among homeowners.
- Rubber weather strips: Perfect for high-traffic areas, rubber strips handle repeated use with ease. They’re commonly used in garages and other heavy-duty spaces.
- Silicone weather strips: Designed for extreme temperatures, these seals hold up well in areas with significant weather fluctuations, such as South Carolina.
- V-strip or tension seals: These seals have a folded design that springs open to fill gaps. Made from durable plastic or metal, they’re particularly effective for double-hung and sliding windows.
| Seal Type | Durability | Installation | Best Use Cases |
|---|---|---|---|
| Foam | Moderate | Easy | Light-use windows and doors |
| Vinyl | High | Moderate | Sliding windows and doors |
| Rubber | High | Moderate | Heavy-duty areas, garages |
| Silicone | High | Moderate | Extreme weather conditions |
| Metal | Very High | Difficult | Commercial, high-traffic areas |
Other options include tubular seals, made from rubber, vinyl, or silicone, which are excellent for high-use areas like door bottoms and window sashes. Foam tape is another versatile choice, particularly effective for sealing irregular cracks around window sashes and door frames.
Benefits of Working Window Seals
Window seals offer more than just draft protection – they improve comfort, efficiency, and even security. Let’s look at some key benefits:
- Energy efficiency: Properly sealed windows help regulate indoor temperatures, reducing the workload on your HVAC system. Homeowners can save an average of 15% on heating and cooling costs through effective sealing and insulation.
- Moisture protection: Seals block water from entering, preventing issues like wood rot, mold, and structural damage. This is especially important in humid areas like South Carolina.
- Noise reduction: Well-sealed windows create a quieter home by keeping out external noises like traffic or lawn equipment.
- Improved air quality: By blocking dust, pollen, and other pollutants, window seals contribute to healthier indoor air.
- Enhanced security: Tight-fitting seals make it harder for intruders to manipulate or force open windows.
Routine inspection and maintenance of window seals are essential to keeping these benefits intact year-round. With 9 out of 10 homes in the U.S. under-insulated, ensuring your window seals are in good shape is a simple but impactful step toward improving your home’s overall performance.
How to Check Window Seals for Problems
Window seals play a key role in keeping your home energy-efficient and free from water damage. Regularly checking them can save you money on energy bills and help you avoid costly repairs later. Drafty windows, for instance, can lead to significant energy loss in homes, making it important to catch issues early.
Problems with window seals often show themselves long before they become major headaches. By knowing the signs and using simple inspection techniques, you can address issues promptly – whether that means fixing them yourself or calling in a professional. Let’s dive into the telltale signs of failing seals and how to inspect them.
Warning Signs of Damaged Seals
Seal problems usually don’t appear out of nowhere – they develop gradually. Here are some common warning signs to watch for:
- Foggy or cloudy window panes: This often indicates moisture trapped between double-pane windows, a clear sign the seal is no longer airtight.
- Drafts or air leaks: If you feel air coming through the window edges, the seal might be compromised.
- Visible gaps or cracks: Check for peeling sealant or warped window panes that let light through.
- Rising energy bills: Poor insulation from damaged seals can cause heating or cooling costs to spike, especially in winter.
- Condensation between panes: Moisture that can’t be wiped away signals that humid air has seeped in through a broken seal.
- Physical damage to frames: Cracks, gaps, or peeling around the edges are red flags.
- Subtle signs: Increased dust near windows or difficulty opening and closing them could also hint at seal deterioration.
Spotting these issues early is key to avoiding more extensive damage.
Inspection Tools You Need
You don’t need fancy equipment to check your window seals – just a few household items can help you identify problems:
- Flashlight: Shine it along the edges of window frames to spot cracks, gaps, or failing caulking, especially in corners.
- Candle Test: Hold a lit candle near the window edges. If the flame flickers, there’s likely an air leak.
- Utility Knife: Lightly run the blade along caulked areas to see if the caulk is still flexible and intact. If it flakes or feels brittle, it’s time for a replacement.
- Smartphone Camera: Take photos of any damage. This can help you track changes over time or provide documentation if you consult a professional.
- Moisture Meter: For a deeper inspection, use this tool to detect hidden water infiltration in the frames or surrounding walls.
If you notice issues during your inspection, you’ll need to decide whether to handle repairs yourself or seek professional assistance.
When to Get Professional Help
While many minor seal repairs can be done on your own, some situations demand professional expertise. Knowing when to call in the pros can save you from making costly mistakes.
- Complex window systems: If you have casement windows, custom-sized units, or windows with integrated blinds or screens, these often require specialized knowledge.
- Structural damage: Problems like wood rot, warped frames, or cracks in the wall near your windows go beyond basic seal repairs and need professional assessment.
- Warranty considerations: Attempting DIY repairs could void your window’s warranty. If your windows are still under warranty, contact the manufacturer or installer first.
- Safety concerns: For broken glass, upper-floor windows, or hard-to-reach areas, it’s best to leave the job to professionals with the right tools and experience.
- Time constraints: If you’re short on time or unsure about your skills, a professional can complete the work efficiently and often provide a service warranty.
DIY sealing typically costs $15–$17, while professional services range from $30 to $50 per hour. However, improper DIY repairs can lead to drafts, water leaks, or even mold growth, creating bigger problems.
For homeowners in South Carolina, Icon Window & Door (https://iconwindowanddoor.com) offers expert guidance and professional installation services. Their local expertise ensures high-quality solutions for maintaining your window seals.
If you’re dealing with multiple problem windows, recurring issues, or planning other home improvements, consulting a professional can help you decide whether repair or replacement is the better option. This is especially true for older windows nearing the end of their 15–20 year lifespan.
sbb-itb-cdbcc3e
How to Replace Window Seals
Replacing damaged window seals is a key step in restoring your windows’ energy efficiency and preventing further problems. While the task requires precision, most homeowners can handle basic seal repairs with the right tools and guidance.
Tools and Materials You’ll Need
Before you start, gather everything you’ll need to make the process smoother and more efficient. Here’s a list of essentials:
- Required tools and materials: Replacement seals, utility knife, putty knife or scraper, caulk gun, sealant, adhesive remover, cleaning solution, measuring tape, and scissors. The type of replacement seal depends on your window style. Rubber seals are versatile, while silicone-based options offer better durability.
- Optional tools: A sealant spreader, hairdryer or heat gun, painter’s tape, and a moisture meter. A heat gun or hairdryer can soften old sealant for easier removal, and painter’s tape helps create neat, straight lines when applying new caulk.
Sealants come in various types, including silicone, acrylic latex, and polyurethane. Each has unique advantages depending on your climate and window surface. For example, in South Carolina’s humid weather, silicone-based sealants are often a better choice than latex alternatives, as they resist moisture and temperature changes.
Once you’ve gathered your tools, you’re ready to follow the steps below to replace your window seals.
Step-by-Step Replacement Guide
Follow these steps to ensure a clean, long-lasting seal:
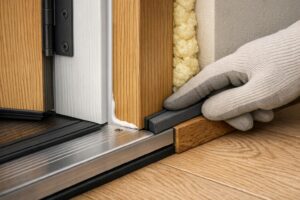
1. Remove the Old Seal
Carefully remove the old seal using needle-nose pliers or a utility knife. Work slowly to avoid damaging the window frame or glass.
2. Clean the Surface
Thoroughly clean the area with a silicone remover or mineral spirits to eliminate any residue. Wipe the surface with a damp cloth, then follow up with rubbing alcohol to ensure it’s completely clean and dry. Proper surface preparation is crucial for good adhesion.
3. Install the New Seal
If the manufacturer recommends it, apply a thin layer of glue before fitting the new seal. Cut the replacement seal slightly longer than needed, so you can trim it to fit perfectly. Insert the seal into the gap, ensuring a snug fit. For seals with an insert tab, gently tap it into place to secure it.
4. Seal the Corners
Apply a drop of glue at the corners to close any gaps and create an airtight seal.
5. Inspect Your Work
Check for any gaps, especially around the corners, and apply extra sealant if necessary.
For uPVC windows, remember that seals on both the frame and the window itself may need replacing. Some homeowners use masking tape along the edges of the gap to make applying sealant easier and achieve cleaner lines.
Comparing Seal Materials
Choosing the right seal material is essential, especially when considering your local climate and window type. Here’s a quick comparison to help you decide:
| Material Type | Best Applications | Temperature Range | Durability | Benefits |
|---|---|---|---|---|
| Silicone Sponge | Moisture-prone areas, general sealing | Moderate to high | Good compression | Excellent water resistance and flexibility |
| Solid Silicone Rubber | Heavy-duty, extreme conditions | -76°F to 482°F | Highest durability | Superior temperature resistance, non-porous |
| Silicone Foam | Low-pressure seals, cushioning | Moderate | Flexible, less durable | Lightweight, vibration dampening |
Silicone sponge is ideal for humid environments like South Carolina, thanks to its water resistance and flexibility. It also handles repeated compression well and is available in flame-retardant varieties.
Solid silicone rubber is a top choice for extreme conditions, offering excellent temperature resistance and durability. However, it tends to be more expensive.
Silicone foam, while good for cushioning and vibration dampening, isn’t as effective in high-compression situations.
Traditional weatherstripping materials, such as organic felts, brushes, or certain plastics, tend to degrade faster. Felts absorb moisture, brushes can become matted, and some plastics may turn brittle or sticky over time.
“This procedure restores your window’s performance.” – Window Hardware Direct
For sliding windows, avoid silicone seals due to their higher friction. Instead, use plastics like polypropylene or nylon, which are smoother and better suited for moving parts. Position weatherseals so they contact the window or door face to reduce issues caused by expansion and contraction. This approach improves long-term performance and minimizes seal failure during temperature changes common in humid regions like South Carolina.
Keeping Window Seals in Good Condition
Taking care of your window seals not only extends their lifespan but also helps maintain your home’s energy efficiency.
Regular Maintenance Steps
- Annual inspections: Check your window seals at least once a year for signs of wear, such as cracks or gaps. Spring and fall are ideal times for inspections, allowing you to address issues before extreme weather conditions arise.
- Regular cleaning: Use mild soap and water to clean seals, removing dirt and debris that can cause premature wear. If you live in coastal areas of South Carolina, monthly cleaning may be necessary to combat salt spray and debris buildup.
- Clear drainage channels: Ensure drainage channels remain unblocked to prevent water buildup, which can lead to mold growth and faster deterioration.
- Lubrication: Apply silicone lubricant to moving parts to prevent rust and corrosion. This not only keeps the seals in good condition but also ensures smooth operation of the mechanisms.
- Repair damage promptly: If you notice cracked caulk, worn weatherstripping, or other damage, fix it right away. Quick repairs can prevent further issues down the line.
- Re-caulking exterior joints: Reapply high-quality caulk annually to ensure a weatherproof seal and protect against water damage.
By following these steps, you can keep your window seals functioning effectively throughout the year.
Selecting Quality Seal Materials
Choosing the right materials is just as important as regular maintenance. The type of seal you need depends on your window style and local climate. In South Carolina’s humid conditions, silicone-based seals are often a better choice than latex due to their moisture resistance and ability to handle temperature fluctuations.
Different windows require different sealing approaches. For example, double-pane windows with argon gas fills need specific seals, while impact-resistant windows – common in coastal areas – benefit from specialized glazing seals designed to withstand high winds and debris.
For guidance on selecting the best materials for your windows, consider consulting experts like Icon Window & Door. Additionally, UV-resistant seals are a smart option for windows exposed to direct sunlight, as South Carolina’s intense summer heat can wear down standard seals faster.
South Carolina Climate Considerations
South Carolina’s climate presents unique challenges for maintaining window seals. High humidity, intense heat, and the potential for hurricanes all demand extra care.
Humidity can cause condensation, mold, and even structural damage around seals. Coastal homes face additional stress from salt spray and high winds, making monthly inspections and cleaning a wise choice in these areas. Seasonal inspections in spring and fall are also important for addressing cracks or damage before summer heat or winter storms set in.
The performance of seal materials can vary depending on the environment. Vinyl and fiberglass windows generally handle moisture better than wood, but even the best materials require consistent upkeep. For homes in hurricane-prone areas, professional installation and regular maintenance are especially critical. Impact-resistant windows, often designed to meet Miami-Dade County standards, rely on proper installation to perform as intended.
Conclusion: Better Home Comfort Through Proper Window Seals
Taking care of your window seals not only makes your home more comfortable but also helps you save money. In fact, weatherizing your home can trim energy costs by up to 30%.
By sealing air leaks, homeowners can save as much as 15% on heating and cooling bills each year. For drafty homes, the savings can be even greater – cutting energy needs by as much as 40%. This is especially important for South Carolina residents, who often deal with scorching summer temperatures.
“By sealing gaps and cracks around windows, you can prevent unwanted drafts and outdoor elements from entering your home. This not only helps in reducing energy waste but also saves money on your utility bills.” – Window Hardware Direct
Beyond the financial benefits, maintaining window seals improves overall home comfort and protection. Proper seals block out outdoor noise, prevent moisture damage (which can lead to mold and rot), and help keep indoor temperatures steady throughout the year. This is particularly vital in South Carolina’s humid climate, where poorly sealed windows can account for up to 60% of a home’s heating and cooling costs due to air leakage.
Spending a little time and effort on seal upkeep can save you from costly repairs down the road. It also extends the life of your HVAC system and creates a more enjoyable living space. Whether you’re dealing with coastal salt air or the inland heat, keeping your window seals in good shape is a smart way to protect your home and your wallet.
FAQs
How can I tell if my window seals need to be replaced?
If your windows aren’t performing as they should, it might be time to check the seals. Common warning signs include foggy or cloudy glass, which often points to moisture trapped between the panes. You might also feel drafts sneaking in even when the windows are closed, or spot visible cracks and gaps in the seals. Another red flag is condensation building up between the panes, and if your energy bills suddenly spike, it’s possible your windows are no longer insulating your home effectively.
Catching these problems early is key. Replacing damaged seals can restore your windows’ efficiency, protect them from further wear, and keep your home cozy throughout the year.
Can I replace window seals on my own, or is it better to hire a professional?
Replacing window seals on your own is doable if the issue is minor, you have the right tools, and you’re comfortable with basic DIY tasks. Tackling small repairs yourself can save you some cash and isn’t too complicated. That said, if the damage is extensive, the job looks tricky, or you’re unsure about how to proceed, it’s usually smarter to bring in a professional. They’ll make sure the seals are installed properly, which helps avoid future problems and keeps your windows performing efficiently.
If you’re leaning toward professional help, Icon Window & Door is a solid choice. They can assist in keeping your windows in top shape, ensuring they stay energy-efficient while enhancing your home’s comfort and style.
What are the best materials for window seals in humid climates like South Carolina?
In humid regions like South Carolina, vinyl and silicone are standout options for window seals. These materials excel at resisting moisture, which is key to preventing mold, mildew, and damage from constant humidity.
Vinyl is a strong contender thanks to its durability, affordability, and low-maintenance nature. It’s a reliable choice for homeowners looking for long-lasting performance. Silicone, meanwhile, brings exceptional flexibility and handles extreme temperature swings with ease, ensuring a snug seal regardless of the weather. Opting for either material will safeguard your windows and help keep your home energy-efficient.