Energy-efficient doors can save you $150–$350 annually on utility bills while reducing energy waste by up to 40% if installed correctly. However, improper installation can negate these benefits, even with high-quality materials. Here’s what you need to know:
- Best Materials: Fiberglass doors with polyurethane foam cores (R-values of R-6 or higher) and insulated steel doors (R-values of R-5 to R-6) offer excellent insulation. For doors with glass, opt for Low-E coatings and multi-pane systems with argon gas.
- Installation Essentials: Properly measure the rough opening for square, plumb, and level alignment. Use shims, low-expansion foam, and caulk to seal gaps. Adjust thresholds and install weatherstripping to block drafts.
- Key Hardware: Multi-point locking systems and adjustable thresholds improve the door’s fit, minimizing air leaks.
- Avoid Common Errors: Misaligned frames, insufficient caulking, and poor threshold adjustments can reduce efficiency by up to 40%. Test with paper, flashlight, or incense to ensure a tight seal.
Investing in energy-efficient doors and focusing on precise installation ensures long-term savings and comfort, especially in hot, humid climates like South Carolina.
Selecting Door Materials for Energy Efficiency
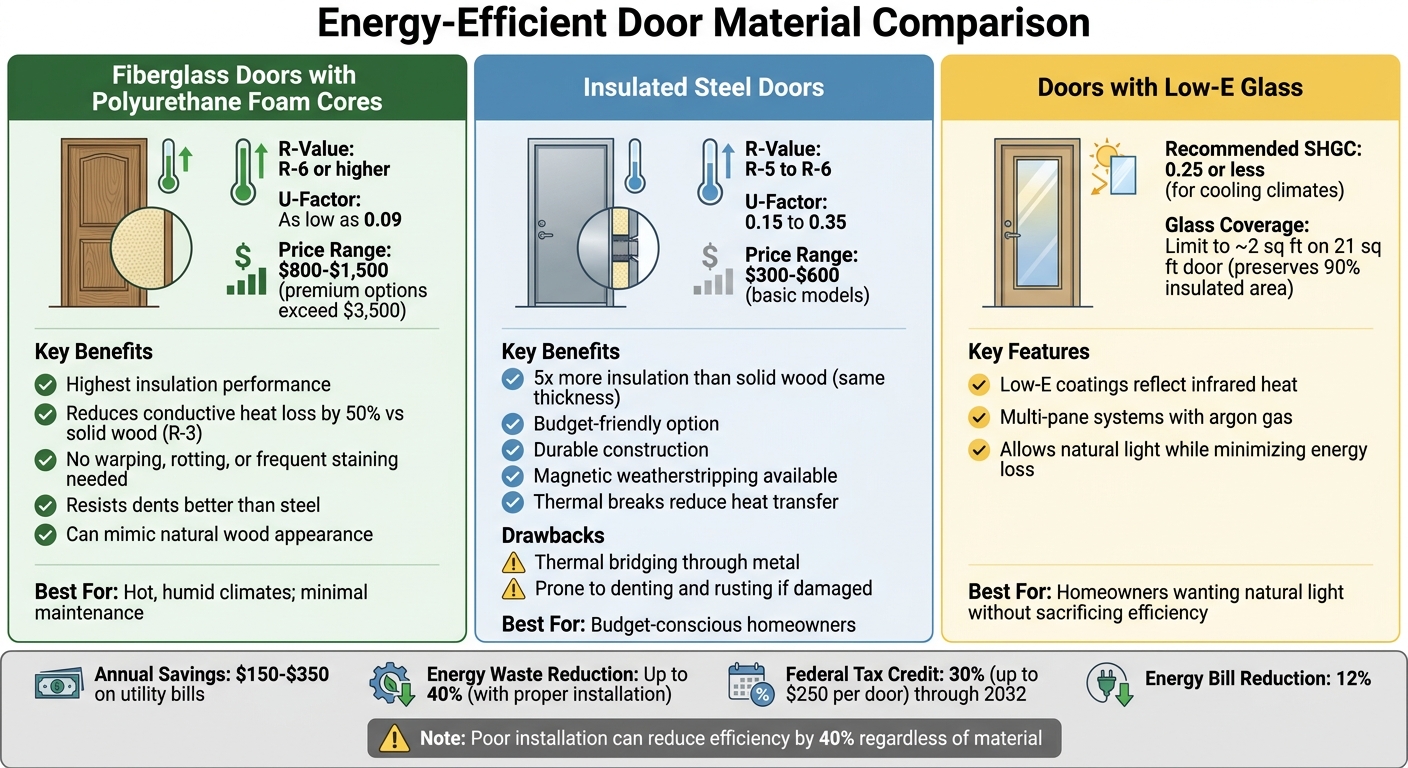
Energy-Efficient Door Materials Comparison: R-Values, Costs, and Performance
The material of your door plays a key role in insulation, durability, and maintenance. In South Carolina’s hot and humid climate, choosing the right material can significantly impact cooling costs and overall comfort. Let’s dive into some of the most effective options for energy-efficient doors.
Fiberglass Doors with Polyurethane Foam Cores
Fiberglass doors with polyurethane foam cores are known for their excellent insulation properties, offering R-values of R-6 or higher. These doors can achieve U-Factor ratings as low as 0.09, meaning they let very little heat pass through. For perspective, upgrading from a solid wood door (R-3) to a fiberglass door (R-6) reduces conductive heat loss by half.
"A fiberglass door with a foam core usually delivers the highest R-value, but low air leakage and appropriate glazing often matter more in real use." – Cosima Sterling, Architectural Strategist, Framewell
Fiberglass doors are also highly durable. Unlike wood, they don’t warp, rot, or need frequent staining. They resist dents better than steel and can be designed to look like natural wood without the extra maintenance. For South Carolina homeowners dealing with high humidity and intense summer heat, fiberglass offers reliable performance with minimal upkeep. Prices for fiberglass doors typically range from $800 to $1,500, with premium options exceeding $3,500.
Insulated Steel Doors
Insulated steel doors are a more affordable option, with basic models priced between $300 and $600. These doors provide R-values between R-5 and R-6, which is a significant step up from solid wood. The U.S. Department of Energy notes that "a 1-1/2 inch (3.81 cm) thick door without a window offers more than five times the insulating value of a solid wood door of the same size".
However, steel doors have a downside: thermal bridging. Heat can bypass the foam insulation by traveling through the metal skin or frame, which makes steel less efficient than fiberglass. U-Factor ratings for steel doors range from 0.15 to 0.35, higher than those of fiberglass doors. Steel is also more prone to denting and rusting if the finish is damaged. Many modern steel doors address these issues with magnetic weatherstripping for a tight seal and thermal breaks – plastic insulators that reduce heat transfer.
Doors with Low-E Glass and Coatings
For doors with glass panels or "lites", Low-E (low-emissivity) coatings are a must. These coatings reflect infrared light (heat) while allowing visible light to pass through, minimizing energy loss without sacrificing natural light. Without these coatings, glass – being a poor insulator – can result in significant energy inefficiency.
In South Carolina’s cooling-heavy climate, focus on a low Solar Heat Gain Coefficient (SHGC) of 0.25 or less to block solar heat. The SHGC measures how well a product prevents heat from sunlight, with lower numbers indicating better performance. Low-E glass is most effective in multi-pane systems (double or triple glazing) that use argon gas between panes for added insulation. To maintain efficiency, keep glass inserts small. For example, limiting glass to a 2 sq ft view lite on a standard 21 sq ft door preserves about 90% of the door’s insulated area.
sbb-itb-cdbcc3e
Preparing the Rough Opening
Getting the rough opening right is key to ensuring your door performs well in terms of energy efficiency. Even a high-quality door can lose its edge if installed in an opening that’s uneven or poorly supported. So, before you start, take the time to measure and inspect the opening carefully.
Measuring for Square, Plumb, and Level
Begin by removing the interior casing to expose the jack studs and header behind the finished jamb. Measure the width at the top, middle, and bottom of the opening between the jack studs, and use the smallest measurement. Repeat this process for the height, measuring from the subfloor to the underside of the header at the left, center, and right, again using the smallest value. For depth, measure from the interior drywall to the exterior sheathing. Standard depths are typically 4 9/16 inches for 2×4 walls and 6 9/16 inches for 2×6 walls.
To confirm the opening is square, measure diagonally from one corner to the opposite corner in both directions. If the two diagonal measurements are within 1/8 inch of each other, the opening is square. Use a 4-foot level to check if the side studs are plumb, and a shorter level to ensure the header and sill are level. If the width at the top and bottom differs by more than 1/2 inch, it could indicate that the wall is out of alignment.
"That ‘extra’ space is not wasted. Guides for professional installers stress leaving roughly 1/4 to 1/2 inch of clearance on each side so shims can bring the jamb plumb, level, and square without forcing the frame." – Cosima Sterling, Architectural Strategist, Framewell
If you’re installing tile or hardwood flooring, factor in the flooring thickness and add 1/8 inch for wood expansion, especially in humid areas like South Carolina.
Once you’ve confirmed the opening is square, plumb, and level, you can move on to checking the structural support.
Checking Structural Support
The structural integrity of the rough opening comes from the header at the top and the jack studs along the sides. These elements redirect the wall’s load around the door instead of directly through it. Before proceeding, check the framing for any signs of damage, such as rot or bowing studs, particularly in older homes. Fix any weak or deteriorating areas to ensure a tight, energy-efficient seal.
The sill area is especially important – it needs to be flat and level so the door sweep can create a proper weather seal. Apply vapor-proof waterproofing to the sill and make sure it slopes slightly toward the exterior to allow for drainage.
"The rough opening needs solid framing. Make sure studs are secure and in the right place before you take measurements for the door." – Ivan Petrushin, Door Expert
Once the opening is inspected and any necessary repairs are made, you’re ready to install the frame for your energy-efficient door.
Installing an Energy-Efficient Door
Once your rough opening is ready, it’s time for your door replacement. This step is critical for ensuring the door functions well and remains energy-efficient for years. Using a pre-hung door can make things easier, but precision is key for achieving a tight, weatherproof seal.
Installing the Door Frame
Start by placing a formed sill pan or a self-adhered membrane at the bottom of the opening. This helps redirect water away from your home. Before securing the door, dry-fit the pre-hung unit to check alignment and identify any uneven spots. Then, apply a continuous bead of exterior-grade sealant along the nailing flange or sill before setting the door in place.
Use a long level to confirm that the frame is plumb, level, and square – this is essential for a proper seal. If the frame is off, it can lead to air leaks and functional issues. Insert shims in pairs at hinge and latch points to distribute pressure evenly and protect the jamb. Once the frame is secured, test the deadbolt to ensure it operates smoothly. If it sticks, the frame might need adjustments.
"The doorframe must be as square as possible, so that the door seals tightly to the jamb and swings properly." – U.S. Department of Energy
Applying Expanding Foam and Caulk
After securing the frame, fill any gaps using low-expansion foam designed specifically for doors and windows. Avoid standard expanding foam, as it can warp the jamb. Insert the foam nozzle about ½ inch into the gaps, moving steadily for even application. For larger gaps, insert a backer rod first to enhance the seal.
Once the foam has cured, trim off the excess and apply caulk along the exterior perimeter. This step helps block drafts and ensures a tight seal.
"Using low-expansion foam specifically formulated for windows and doors is crucial to avoid distorting the jambs and ensure a proper seal." – Building Science Corporation
One homeowner who followed this process reported a noticeable reduction in drafts and saw winter energy bills drop by about 15%. These sealing measures lay the groundwork for further air-leak prevention.
Installing Weatherstripping and Door Sweeps
Weatherstripping and door sweeps serve as the final barrier against air leaks. They’re essential for preserving your door’s energy efficiency. Before installation, clean the door and frame with soapy water, and use fine-grit sandpaper to remove stubborn grime. Tighten all hinge screws to keep the door square and level.
Measure the gap between the door and jamb at several points, as these measurements can vary. Cut the weatherstripping slightly longer than the gap to ensure a snug fit, especially at the corners. Attach it to the door jamb instead of the door itself to minimize wear.
For the door sweep, attach it to the bottom of the door, ensuring it compresses firmly without hindering movement. Pre-drill holes to prevent the wood from splitting, and trim the metal sweep with a hacksaw if needed. Test the door multiple times to confirm smooth operation and ensure the weatherstripping doesn’t cause sticking. When installed correctly, weatherstripping can lower heating and cooling costs by up to 20%.
Choosing Hardware for Energy Performance
Picking the right hardware does more than secure your door – it also plays a big role in improving energy efficiency. While proper installation and sealing are key, the hardware you choose can help minimize energy loss. For instance, energy-efficient hinges and locks ensure your door seals tightly against weatherstripping, cutting down on air leaks and keeping your home comfortable. Even the most efficient door materials can fall short if the hardware doesn’t create a snug, secure fit.
Energy-Efficient Hinges and Locks
When it’s time to choose door hardware, look for materials that don’t easily conduct heat or those that include thermal breaks. Metal handles and hinges, for example, can transfer heat, but thermal break options help reduce this issue. High-quality locks not only protect your home but also ensure the door aligns properly with its seals. Multi-point locking systems are particularly effective because they secure the door at multiple points along the frame, creating an even tighter fit. Additionally, automatic door closers with smart sensors fine-tune closing speeds to limit unwanted air exchange.
Once you’ve handled the locks and hinges, it’s time to focus on the threshold for an even stronger energy barrier.
Threshold Seals and Adjustments
The threshold is one of the most common places for energy loss, making adjustable thresholds a smart choice to eliminate gaps at floor level. Pairing an adjustable threshold with a high-quality door sweep can effectively block drafts and moisture. Over time, as homes settle and materials wear, it’s important to check and adjust the threshold annually. A properly adjusted threshold should maintain solid contact with the door sweep without interfering with the door’s movement.
For outswing doors, consider adding a rain skirt to the door sweep. This extra layer of protection helps guard against wind-driven rain and drafts. Regular maintenance, like lubricating hinges and locks once a year, also ensures the door closes tightly and remains fully engaged with the weatherstripping around its edges.
Final Sealing and Quality Checks
The final steps in installing an energy-efficient door involve sealing and quality checks. Properly completing these steps ensures your door performs as intended. Even the best doors can lose 20% to 40% of their energy efficiency due to installation errors. By taking the time to seal correctly and inspect thoroughly, you can avoid drafts and save on energy bills for years to come.
Common Installation Mistakes to Avoid
Some of the most frequent errors during installation include frame misalignment and sealing gaps. A crooked frame creates uneven spaces around the door, allowing air to seep through even when closed. This often happens when installers skip using a spirit level or rush the shimming process. Over-shimming can also distort the frame, preventing the weatherstripping from sealing properly.
Another common issue is insufficient caulking. When caulk is only applied to visible areas, critical spots behind the exterior brickmould and interior trim are often missed. This allows air and moisture to bypass the frame, leading to energy loss and potential damage. Threshold adjustments are another trouble spot – when done poorly, they can lead to drafts or even allow pests to enter. Careful adjustment of the threshold screws ensures the door sweep makes firm, even contact without hindering the door’s movement. Additionally, correctly installed weatherstripping plays a vital role in preventing these problems.
How Installation Errors Affect Energy Efficiency
The table below highlights common mistakes, their impact on energy performance, and how to prevent them:
| Installation Error | Impact on Energy Efficiency | Prevention Method |
|---|---|---|
| Misaligned Frame | Creates uneven gaps, leading to air leakage. | Use a spirit level to ensure proper alignment throughout the installation. |
| Improper Shimming | Distorts the frame, preventing proper sealing. | Gradually shim hinge and strike points; avoid over-tightening. |
| Insufficient Caulking | Allows air and moisture to bypass the frame. | Apply a continuous bead of caulk behind the exterior brickmould and interior trim. |
| Poor Threshold Adjustment | Results in drafts and potential pest entry. | Adjust screws to ensure the door sweep contacts the threshold evenly. |
| Inadequate Air Sealing | Reduces thermal efficiency by 20-40%. | Fill gaps between the jamb and rough opening with low-expansion foam. |
Simple Tests to Verify Installation
Once installation is complete, a few simple tests can confirm whether the sealing and adjustments are effective:
- Paper Test: Close the door on a piece of paper. If you feel resistance when pulling it out, the seal is tight.
- Flashlight Test: In a dark room, shine a flashlight along the door edges. Any visible light escaping indicates gaps.
- Incense Test: Light an incense stick and move it near the door edges. Watch for smoke movement to detect drafts.
Before applying weatherstripping, clean all surfaces with a mild detergent. If you’re using adhesive-backed materials, ensure the temperature is above 20°F (-7°C) for proper bonding. These checks and adjustments guarantee that every gap is sealed and the door meets energy efficiency standards.
Conclusion
Creating an energy-efficient door starts with choosing the right materials, ensuring precise installation, and achieving a complete seal. Fiberglass doors with polyurethane foam cores, for example, offer up to four times the insulation of solid wood doors of the same thickness. Insulated steel doors, on the other hand, provide a durable and budget-friendly option. However, even the best materials won’t perform as intended if the door frame isn’t perfectly square, plumb, and level. In fact, poor installation can reduce efficiency by as much as 40%.
Upgrading to an energy-efficient door isn’t just good for the environment – it’s good for your wallet. Replacing an old, inefficient door can save between $150 and $350 annually, trimming energy bills by 12%. Plus, a federal tax credit of 30% (up to $250 per door) through 2032 sweetens the deal with both immediate savings and long-term benefits.
But the real key to maximizing these benefits lies in the details of the installation. Careful steps, like using low-expansion foam and adjusting the threshold correctly, ensure your door performs as promised. Weatherstripping must fit snugly to prevent leaks without warping the frame. Ultimately, these small but critical details make the difference between an efficient door and one that lets air – and money – slip away.
FAQs
How can I check if my rough opening is square and plumb?
To make sure your rough opening is properly square and plumb, grab a level to check both vertical and horizontal alignment, and use a square tool to confirm the corners are at right angles. The sides should be perfectly vertical, while the top and bottom need to be level. If anything is off, you can fix it by adding shims during installation. Taking these steps ensures your door will fit correctly and function without any issues.
Should I use foam, caulk, or both to air-seal a new door?
To effectively seal air leaks, use a combination of caulk and weatherstripping. Caulk is perfect for filling cracks and gaps around stationary areas, like door frames. On the other hand, weatherstripping is designed for sealing moving parts, such as the door itself. Together, these methods help reduce air leakage and improve energy efficiency in your home.
What’s the fastest way to find drafts around a finished door?
To spot drafts around a closed door, try these simple steps:
- Look for light: Check if any light seeps through gaps around the doorframe.
- Feel for airflow: Run your hand slowly along the edges of the door to detect air movement.
- Use a flame or smoke test: Hold a lit incense stick or a tissue near the edges of the door. If the flame flickers or the smoke/tissue moves, you’ve found a draft.
These techniques are quick and effective for identifying air leaks.