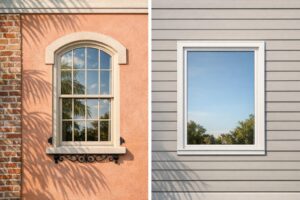
Wood doors and windows are beautiful but require regular maintenance to stay in good shape. Seasonal changes – like summer heat, winter cold, and spring rains – can cause wood to expand, contract, or absorb moisture, leading to issues like rot, warping, and energy loss. Here’s how you can protect your investment year-round:
- Spring: Inspect for winter damage, clean surfaces, repair caulking, and touch up finishes.
- Summer: Apply UV-resistant finishes, clean regularly, and check seals to prevent heat and humidity damage.
- Fall: Replace weatherstripping, lubricate hardware, and prepare for winter cold.
- Winter: Monitor for moisture and condensation, fix paint damage, and ensure seals remain tight.
Consistent care not only preserves the look and function of your wood features but also saves on energy costs and extends their lifespan.
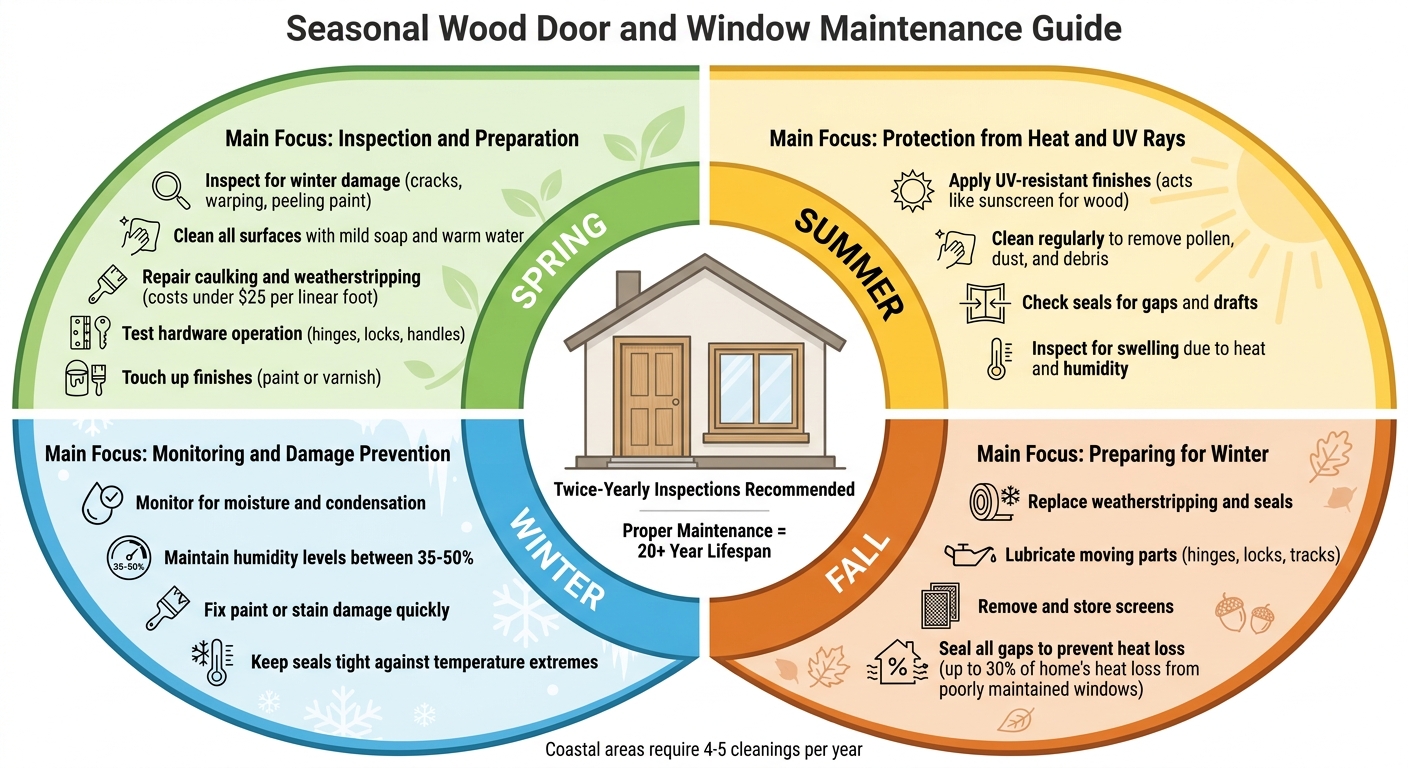
Seasonal Wood Door and Window Maintenance Guide
Spring: Inspection and Preparation
Spring is the perfect time to assess how winter’s freeze-thaw cycle has affected your wood doors and windows. It’s also an opportunity to prepare them for the warmer months ahead. Start by inspecting both interior and exterior surfaces for cracks, warping, or signs of moisture damage, paying close attention to wood frames that may have expanded due to frozen water.
Check for Winter Damage
Kick off your spring maintenance by identifying any damage caused by winter conditions. Look for peeling paint, cracks, or warping on all wood doors and windows. Pay extra attention to window seals, as cold weather can make them brittle and prone to cracking. To check for drafts, hold your hand near the frame and feel for any air movement.
According to Renewal by Andersen of Greater Wisconsin, "The cold can make seals brittle and crack, leading to unwanted drafts and increased heating costs."
Don’t forget to test all hardware, including knobs, handles, and locks. Ensure they move smoothly and listen for squeaks in hinges or tracks, which may indicate the need for cleaning or lubrication.
Clean All Surfaces
Before tackling repairs, clean all surfaces thoroughly to reveal any hidden damage. Use a solution of mild dish soap and warm water, along with soft microfiber cloths or lint-free rags, to avoid scratching the wood’s protective coating. Avoid abrasive tools like steel wool. Clean from top to bottom, using a toothbrush for tight spaces. For window tracks and sills, vacuum first with a soft brush attachment, then wipe them down with the soapy solution. Finish by rinsing with clean water to remove any detergent residue that might harm the finish. This step not only cleans but also makes it easier to spot areas needing attention.
Repair Caulking and Weatherstripping
Once everything is clean and dry, inspect the weatherstripping for gaps. A quick way to test this is by looking for light leaking between doors and thresholds – any visible light means the seal is no longer effective. Carefully remove old weatherstripping with a plastic putty knife or needle-nose pliers, then clean the channel with denatured alcohol and a dry cloth. This ensures the area is debris-free before installing new seals. For windows, start with the head jamb (top) weatherstrip, then move to the side jambs. Whenever possible, use replacement materials recommended by the manufacturer for a proper fit. DIY weatherstripping typically costs under $25 per linear foot, making it an affordable way to improve energy efficiency.
Test Hardware Operation
Ensure all hinges, locks, and handles are functioning smoothly. If any hardware feels stiff or difficult to move, clean it with a mild soap solution and let it dry before applying a silicone-based lubricant. Spring is also an ideal time to remove salt residue left over from winter, as it can corrode metal parts and damage wood finishes.
Touch Up Finishes
Inspect the finishes on your wood doors and windows to determine if repainting or re-staining is necessary. Winter weather can cause fading and wear, leaving surfaces vulnerable.
Renewal by Andersen of Greater Wisconsin advises, "Wooden doors may require a fresh coat of paint or varnish for added protection."
Focus on areas where the finish has worn thin or peeled, as these spots are more prone to moisture damage during the humid summer months. Touching up now will help protect your wood features from the intense UV rays and humidity of the upcoming season.
sbb-itb-cdbcc3e
Summer: Protection from Heat and UV Rays
As summer rolls in, it’s time to step up your wood protection game. The intense sun and soaring temperatures can wreak havoc on wood finishes, leading to fading, cracking, and other damage. Prolonged exposure to sunlight can break down unprotected finishes, leaving wood vulnerable to moisture issues. To keep your doors and windows in top shape, it’s crucial to take steps now to shield them from the season’s harsh heat and UV rays.
Apply UV-Resistant Finishes
Think of UV-resistant finishes as sunscreen for your wood. These high-quality exterior finishes protect against dullness, discoloration, and chalky textures caused by UV exposure. Look for products labeled "UV-resistant" or "UV-stable", such as exterior-grade acrylic or polyurethane finishes, which can handle the expansion and contraction caused by fluctuating temperatures.
When deciding between paint and stain, remember that paint generally offers a stronger barrier against UV rays and moisture. Stain, on the other hand, highlights the natural wood grain but may fade faster under direct sun. If your wood surfaces face prolonged sunlight, consider using lighter or mid-tone neutral colors to reduce heat absorption.
"A durable finish acts like sunscreen for the material underneath, especially on wood and fiberglass", says Frame-well.
Before applying a UV-resistant finish, clean the surface thoroughly to remove dirt, mildew, and minor imperfections. Lightly sand the wood, repair any small cracks in the caulking, and apply the finish in thin, even layers. Always follow the drying times listed on the product label for the best results.
Clean Regularly
Summer brings more than just sunshine – it also delivers pollen, dust, and debris that can cling to wood surfaces. These contaminants can trap moisture, speeding up the breakdown of protective finishes. Regular cleaning with a soft cloth and wood-safe cleaners can help remove these particles. Avoid petroleum-based products or harsh chemicals, as they can strip away protective coatings.
Frequent cleaning not only keeps your wood looking polished but also allows you to catch early signs of UV damage. Watch for dull patches where the finish has lost its sheen or small cracks that could indicate wear and tear.
Check Seals
The heat and humidity of summer can cause wood to swell, leading to sticky doors and windows or operational issues. Inspect weatherstripping and trim for gaps or compressed areas, and check for drafts by feeling along the edges. If you notice cloudy glass or condensation between double-glazed panes, it could signal a broken seal, which may require professional attention.
Sealing gaps remains a key defense against moisture-related problems. Use caulk or foam tape to fill any openings, and make sure to clean and lubricate hinges and tracks. This will ensure smooth operation even as the wood expands during the hot months.
Fall: Preparing for Winter
As the temperatures dip and winter looms, fall becomes your last opportunity to get your wood doors and windows ready for the cold. This season is all about creating an airtight seal to prevent heat from escaping and moisture from creeping in. Did you know that poorly maintained windows can account for up to 30% of your home’s heat loss? Tackling these tasks now can help you save on energy bills while protecting your wood surfaces from the harsh winter conditions. By building on the maintenance you’ve done in spring and summer, you’ll set the stage for a smooth winter transition.
Replace Weatherstripping and Seals
Start by checking for drafts. On a windy day, listen for whistling sounds around your doors and windows, or try the candle test – hold a lit candle near the edges and watch for flickering flames, which indicate air leaks. Peeling paint near windows can also signal moisture issues. Once you’ve identified problem areas, remove any cracked or brittle caulking and replace it with fresh caulk to seal gaps. Swap out worn weatherstripping around frames to block cold air, water, and even pests.
"Damaged weatherstripping can lead to drafts, energy loss, and even water infiltration. Replace any worn or damaged weatherstripping to ensure a tight seal." – Pinup Houses
Don’t forget to inspect door thresholds for wear or gaps, as these can let in cold air and moisture. Make sure all sides of your wood frames are sealed with paint or stain to keep the wood from absorbing moisture and swelling during the winter. A well-sealed frame means better insulation and smoother operation when the weather turns icy.
Lubricate Moving Parts
Cold weather can make hinges, locks, and window tracks stick or freeze, so it’s a good idea to lubricate these moving parts before winter arrives. Use silicone spray or a light oil, but first, give the hardware a thorough cleaning with mild soap and water to remove dirt, grime, or salt residue. Be cautious when applying lubricant – avoid spraying directly onto wood surfaces, as it can damage finishes. Wipe away any excess immediately to keep your wood looking polished and protected.
Remove and Store Screens
Taking down your screens can improve air circulation and help prevent condensation. Moisture trapped between screens and windows can lead to mold, which not only damages wood frames but also poses health risks. Clean the screens with mild soap and water, then inspect them for any holes or tears. Repair minor damage or replace heavily worn screens so they’re ready for spring. Make sure screens and frames are completely dry before storing them to avoid wood rot or musty odors. Plus, removing screens lets more natural light into your home during the shorter, darker winter days.
Winter: Monitoring and Damage Prevention
After the thorough sealing efforts of fall, winter brings its own challenges. The cold and moisture of the season require careful monitoring to protect your wood surfaces. Even with solid fall preparations, issues like condensation, temperature fluctuations, and indoor humidity can still pose risks.
Check for Moisture and Condensation
Keep an eye out for signs of excess moisture, such as foggy windows, water droplets on frames, or pooling on sills. If you find yourself using multiple paper towels to wipe away morning condensation, it’s a sign that indoor humidity levels may be too high and need immediate attention. A digital hygrometer is a handy tool to track humidity – aim to keep levels between 35% and 50%. If they creep above 60%, consider using a dehumidifier to protect wood from warping and rot.
Focus on areas where moisture tends to collect, like window sills, bottom rails, glazing edges, and corners. Look for dark spots, discoloration, bubbling paint, or musty smells, as these may signal early wood damage. Press gently on suspicious areas – softness often indicates rot. If condensation or fog appears between glass panes rather than on the surface, this could mean a failed seal that has lost its insulating gas, which typically requires professional replacement. To improve air circulation, open blinds and shades during the day, as this prevents moisture from becoming trapped against wooden surfaces.
Addressing moisture issues promptly is key to avoiding finish damage and more extensive repairs.
Fix Paint or Stain Damage Quickly
Winter’s condensation and freeze-thaw cycles can wreak havoc on paint, causing peeling, blistering, or cracking. When you notice these issues, act fast. Make sure the wood is completely dry before repairing the damaged areas to prevent further exposure to moisture. For exterior wood that faces harsh freeze-thaw conditions, flexible polyurethane finishes can be a better option, as they handle temperature changes more effectively.
"Paint that’s applied to a damp surface or paint that’s exposed to high humidity can peel easily." – Woods.se
Keep Seals Tight
Even after replacing seals in the fall, winter’s temperature extremes can cause them to shift or fail. Regular testing can catch these seasonal changes. Try the paper test: close a piece of paper in your window or door, and if it slides out easily, you may need thicker weatherstripping. Another method is the incense test – hold a lit incense stick near seams and watch the smoke. If it drifts in a particular direction, it indicates an air leak. Remember, poorly maintained windows can account for up to 30% of your home’s heat loss. Fixing these gaps not only saves on energy costs but also protects your wood from moisture infiltration.
Long-Term Maintenance and Refinishing
To keep your wood door in great shape for decades, combine regular seasonal care with deeper maintenance every few years. This approach helps maintain its structure and appearance, potentially extending its lifespan to over 20 years with consistent refinishing and protective treatments.
Repaint or Restain Every 4–8 Years
The decision to refinish should depend on the wood’s condition rather than sticking to a strict schedule. Signs like weathering, rough or splintered surfaces, or visible mold and mildew mean it’s time to refinish. Areas exposed to direct sunlight often need more frequent touch-ups due to faster finish deterioration. For the best results, use a multi-layer system: start with a coat of 100% acrylic, UV-resistant primer, followed by two top coats. Inspect the door twice a year to spot damage early and plan refinishing as needed.
In addition to refinishing, other treatments can help preserve the wood’s integrity.
Apply Rot-Resistant Treatments
Sealing the wood is essential to block moisture and prevent rot. If you notice softening or early signs of aging in the wood, applying epoxy hardeners can strengthen the fibers and stop further deterioration. Use high-quality elastomeric or silicone caulk on joints, seams, and gaps to create a watertight seal. In areas with high humidity or coastal conditions, reapply penetrating stains or clear sealants annually for added protection. For oil-based finishes like Osmo, a single coat every two years can maintain the seal without requiring sanding.
Fix Small Cracks or Chips Early
Small issues like cracks or chips can quickly escalate if ignored. During regular inspections, look for chipped paint, splinters, faded spots, or cracks in the topcoat. A flashlight can be helpful to spot hidden damage, such as deeper cracks or early signs of rot. For minor cracks or holes, clean them out, fill with wood filler, and sand smooth before repainting or restaining. If there are splits, glue and clamp the pieces together, then sand the area – starting with coarse sandpaper and finishing with fine-grit – for a smooth repair. Addressing these imperfections early can prevent more serious structural problems down the line.
Coastal and High-Moisture Area Considerations
Living near the coast comes with its own set of challenges, especially when it comes to maintaining wood doors and windows. For homes along South Carolina’s coast, the salt air poses a unique threat. The sodium chloride particles in the air attract and hold onto moisture, which speeds up wood decay and corrosion. This can lead to problems like bubbling paint, worn-out protective finishes, and rusting metal hardware.
Clean More Often
Coastal homes require extra attention, with cleaning recommended 4–5 times a year to remove salt deposits. If left unchecked, these deposits can trap moisture against wood surfaces, causing damage over time. Stick to mild soap and water applied with a microfiber cloth, and steer clear of abrasive or petroleum-based cleaners that can strip finishes. During each cleaning, check for signs of clear coat wear, musty odors that might indicate hidden mold, or black streaks that suggest tannin bleed or water stains. These regular cleanings go a long way in preventing damage caused by salt buildup.
Protect Hardware from Rust
Metal hardware is especially vulnerable in salty, humid environments. To combat this, stainless steel is a smart choice for locks, handles, and hinges. Inspect hardware every few months and use silicone-based lubricants to keep moving parts in good shape – avoid WD-40, as it can harm wood finishes. Cleaning hardware regularly also removes salt deposits before they can lead to corrosion.
Use Moisture-Resistant Finishes
To shield wood surfaces from the harsh coastal elements, apply flexible exterior polyurethane finishes or sealants specially made for marine environments. For those seeking durability, hardwoods like Mahogany or Teak are excellent options. Their density and natural oils make them resistant to salt air and humidity. Don’t forget to routinely inspect caulking and weatherstripping to ensure they’re effectively keeping out salt spray and moisture.
Conclusion
Wood doors and windows need care throughout the year to stay in good shape. Regular seasonal maintenance helps prevent problems like rot, warping, or seal failure caused by the natural expansion and contraction of wood. By performing twice-yearly inspections in spring and fall, you can catch small issues early and avoid costly repairs or replacements later on.
Taking care of your wood features also helps lower energy costs. Proper sealing reduces energy loss, which means smaller utility bills. Beyond that, well-maintained wood preserves the charm and value of your home – something particularly important for historic properties.
"A little effort goes a long way. Well-cared-for wood windows not only last longer, but they also help keep your energy bills in check and maintain the beauty of your home." – Energy Swing Windows
This quote highlights how consistent upkeep pays off. Simple steps like gentle cleaning with mild soap and water, lubricating hardware with silicone-based products, and managing moisture with proper sealing protect wood from its biggest threats: moisture, UV rays, and pests. Each season presents unique challenges – summer’s intense UV rays and winter’s freeze-thaw cycles, for example – but a proactive approach ensures your windows and doors stay in great condition year-round.
Whether you’re dealing with coastal salt air or dry inland climates, the principle is the same: regular care prevents minor wear from escalating into major damage. With proper upkeep, wood doors and windows can last for decades, improving your home’s performance and value over time. By sticking to a seasonal maintenance routine, you’re not just protecting your investment – you’re ensuring your doors and windows continue to enhance your home for years to come.
FAQs
How can I tell if my wood window seal has failed?
You can spot a failed wood window seal by looking for condensation trapped between the glass panes, a clear sign that moisture has seeped in. Another clue is persistent dirt or a distorted appearance on the glass that remains even after thorough cleaning. These are strong indicators that the seal has been compromised.
What indoor humidity level helps prevent wood rot in winter?
Keeping indoor humidity below 60% during winter is crucial to avoid wood rot. When the air holds too much moisture, it can penetrate wood surfaces, causing gradual damage. To prevent this, consider using a dehumidifier or ensuring proper ventilation. These steps can help maintain safe humidity levels and safeguard your wood doors and windows.
When should I call a pro instead of DIY repairs?
If your wood doors or windows show serious structural damage, such as large cracks, warping, rotting, or damaged seals and weatherstripping, it’s time to call in a professional. These issues often go beyond what basic maintenance can handle. Tasks like replacing substantial sections of wood, repairing the overall structure, or resolving hardware problems that affect security or insulation require expert skills to ensure everything is restored correctly and safely.