Want to save on energy bills and make your home more comfortable? Weatherstripping doors is a simple and affordable solution. It seals gaps around doors to prevent air leaks, reduce drafts, and block moisture, dust, and noise. This can cut heating and cooling costs by 5% to 30% annually while extending the life of your HVAC system.
Here’s what you need to know:
- Signs you need weatherstripping: Drafts, visible gaps, rising energy bills, or worn seals.
- Material options: Foam tape (easy and cheap), V-strips (durable), silicone seals (long-lasting), and door sweeps (for bottom gaps).
- Costs: Foam tape starts at $4.88, while premium options like automatic door bottoms can go up to $150.
- Installation: Measure, clean, and apply strips carefully. Most projects take under an hour.
- Maintenance: Inspect yearly, clean with mild soap, and replace damaged sections.
Weatherstripping is especially useful for South Carolina homes, where humidity and coastal weather put extra strain on door seals. The right materials can help manage indoor air quality, lower energy bills, and keep your space comfortable year-round.
Why Weatherstripping Matters for South Carolina Homes
South Carolina’s climate brings unique challenges for homeowners, making weatherstripping an important part of home maintenance. With high humidity throughout the year, fluctuating temperatures between seasons, and coastal weather patterns, door seals are often put to the test. Without proper weatherstripping, homes can face issues like moisture intrusion, drafts, and rising energy costs.
In summer, weatherstripping helps keep cool, air-conditioned air inside by sealing gaps around doors, reducing the strain on your HVAC system. During winter, it blocks cold air from creeping in, especially during weather fronts. Coastal areas, in particular, face strong wind gusts from nor’easters and winter storms, with conditions often resembling tropical storms. As Armor Building Solutions explains:
Cold air, wind, and moisture all exploit gaps and worn seals – exactly the conditions that are prevalent in our region during winter storms.
Weatherstripping also helps manage indoor humidity, a critical concern in South Carolina’s consistently humid environment. By sealing doors properly, homeowners can keep out moisture, pollen, dust, and allergens while improving energy efficiency. A tighter seal means less wear and tear on your HVAC system, fewer filter changes, and a longer lifespan for the unit. Understanding these advantages highlights why proper installation and upkeep, covered later in this guide, are so important. For those looking to protect their homes further, the SC Safe Home Program offers up to $3,000 in financial assistance for storm damage prevention measures.
Signs Your Door Needs Weatherstripping
The challenges posed by South Carolina’s climate often show up as telltale signs around your doors:
- Feeling drafts near your door is a strong indicator of compromised weatherstripping.
- Visible gaps, like light peeking through the door frame or thresholds, suggest the seal is no longer effective.
- A sudden spike in energy bills may mean your HVAC system is working overtime to compensate for air leaks.
- Dust, pollen, or moisture build-up near doorways could signal failing seals.
- Weatherstripping that’s cracked, torn, brittle, or compressed should be replaced.
Annual inspections, especially before winter, can help you catch and address these issues early, ensuring your home stays comfortable and energy-efficient year-round.
sbb-itb-cdbcc3e
Types of Weatherstripping for Doors
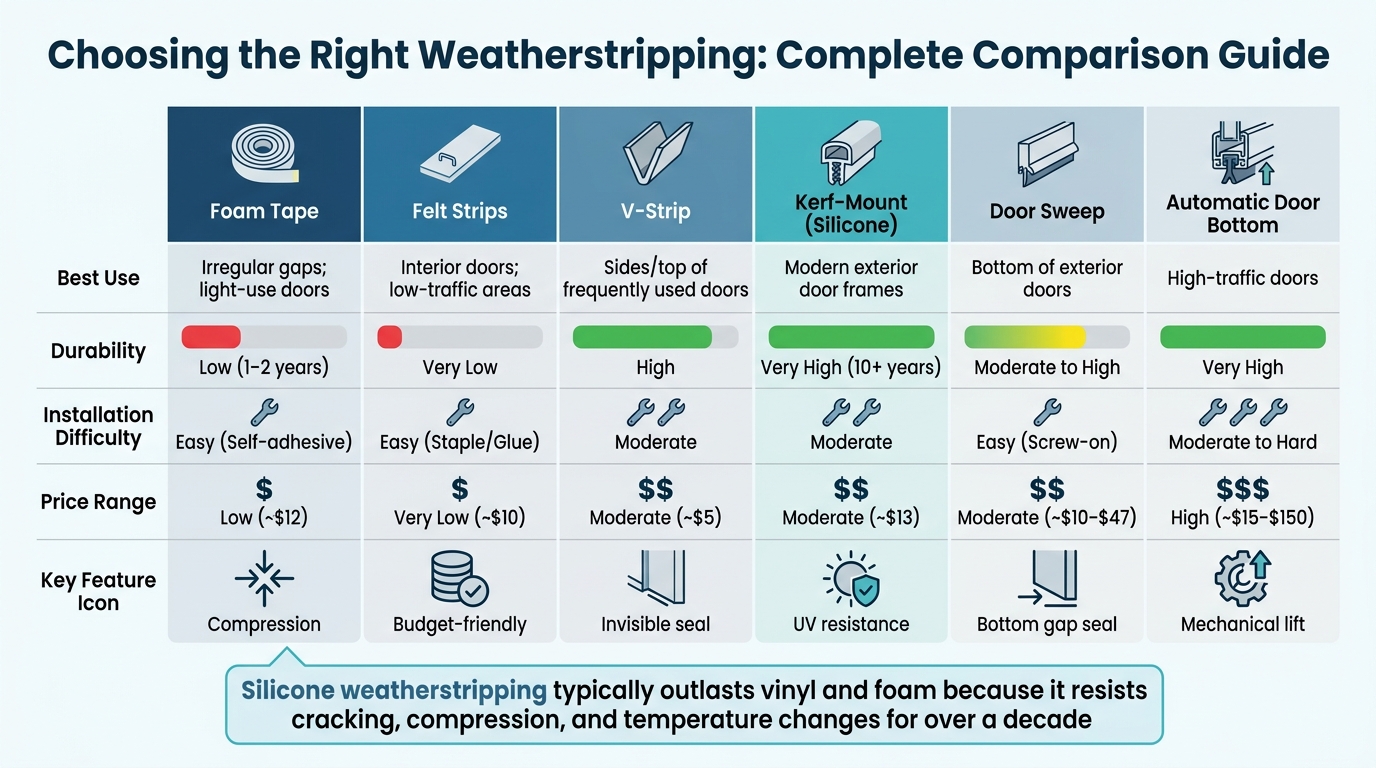
Weatherstripping Types Comparison: Durability, Cost, and Best Uses
Choosing the right weatherstripping depends on factors like where the door is located, how often it’s used, and your budget. Each option offers its own strengths and weaknesses. Below, we’ll break down the different types so you’re ready for the installation steps ahead.
Foam Tape and Felt Strips
Foam tape is a great pick for beginners. With its adhesive backing, installation is as simple as peeling and sticking it onto the door frame. When the door shuts, the foam compresses to fill irregular gaps. However, foam tape doesn’t last forever – it typically needs replacing every one to two years.
Felt strips are even easier on the wallet, usually costing about $9.68 per roll. These can be attached with staples or glue along the door frame. But according to the U.S. Department of Energy, felt isn’t as durable or effective at blocking airflow. It wears out quickly from moisture and friction, so it’s better suited for interior doors or areas with minimal traffic.
V-Strip and Kerf-Mount Seals
V-strips (also called tension seals) are folded into a V-shape and press against the door frame to block drafts. They’re durable, almost invisible when the door is closed, and ideal for high-traffic areas. Vinyl V-strips cost around $4.88 per roll, while metal versions offer even longer-lasting protection.
Kerf-mount seals fit neatly into a pre-cut groove in the door frame, providing a professional-grade seal. Silicone versions are especially effective in climates like South Carolina’s, as they resist UV damage and can maintain their seal for more than a decade. Conner Mulrooney from DoorsForPros explains:
Silicone weatherstripping typically outlasts vinyl and foam because it resists cracking, compression, and temperature changes for over a decade.
These seals are priced around $13.00 and are commonly found in modern exterior door frames.
Door Sweeps and Thresholds
Door sweeps attach to the bottom of the door and use materials like vinyl, brush, or neoprene to seal gaps between the door and the floor. Basic adhesive sweeps start at $9.99, while heavy-duty aluminum versions range from $44.00 to $47.00. Brush sweeps are particularly useful for uneven thresholds since they can adapt to irregular surfaces.
Automatic door bottoms (ADBs) offer a mechanical solution. They lower a gasket to the floor only when the door closes, avoiding wear and tear from dragging across carpets or flooring. While pricier, ADBs are perfect for frequently used doors where standard sweeps might wear out too quickly.
Threshold seals are built into the floor plate itself and often feature vinyl bulbs or "frost-brake" designs combining wood and metal to minimize heat transfer. These are especially effective in coastal areas where extra rain protection is needed.
Comparison Table
| Weatherstripping Type | Best Use | Durability | Installation Difficulty | Price Range |
|---|---|---|---|---|
| Foam Tape | Irregular gaps; light-use doors | Low (1–2 years) | Easy (Self-adhesive) | Low (~$12) |
| Felt Strips | Interior doors; low-traffic areas | Very Low | Easy (Staple/Glue) | Very Low (~$10) |
| V-Strip | Sides/top of frequently used doors | High | Moderate | Moderate (~$5) |
| Kerf-Mount (Silicone) | Modern exterior door frames | Very High (10+ years) | Moderate | Moderate (~$13) |
| Door Sweep | Bottom of exterior doors | Moderate to High | Easy (Screw-on) | Moderate (~$10–$47) |
| Automatic Door Bottom | High-traffic doors | Very High | Moderate to Hard | High (~$15–$150) |
Up next, we’ll cover the tools and materials you’ll need to get started with installation.
Tools and Materials Needed for Weatherstripping Installation
Having the right tools on hand can make weatherstripping installation quick and efficient – often taking less than an hour to complete. Start by using a tape measure to record the dimensions of the door jamb and the thickness of any gaps. These measurements are crucial for ensuring the weatherstripping fits snugly without interfering with the door’s ability to close properly.
Before applying the weatherstripping, make sure the door frame is clean. Use a sponge, soapy water, and fine-grit sandpaper to remove any dirt or old adhesive. This step ensures the new weatherstripping adheres properly. If you’re dealing with leftover adhesive from pressure-sensitive strips, petroleum jelly can help dissolve it effectively.
For cutting, have the appropriate tools ready: scissors or a utility knife for foam, felt, or vinyl materials, and a hacksaw for trimming metal sweeps. To secure the weatherstripping, you’ll need a screwdriver or drill, depending on the type of fasteners used. As Bob Vila emphasizes:
To coax the greatest value from its insulating properties, weatherstripping must be installed correctly.
If you’re working with non-adhesive strips made of rubber or felt, a hammer and finishing nails or a heavy-duty stapler may also be required.
Preparation Tips
Before you begin, take some additional steps to ensure the installation goes smoothly:
- Tighten all hinge screws to make sure the door hangs evenly.
- Purchase about 10% extra weatherstripping to account for any trimming mistakes.
- Plan to install on a dry day when the temperature is above 60°F, as adhesives tend to perform better in these conditions.
Proper preparation is essential for creating a durable, effective seal.
Installation Checklist
| Category | Items Needed |
|---|---|
| Measuring & Cutting | Tape measure, utility knife, scissors, hacksaw (for metal sweeps) |
| Cleaning Supplies | Sponge or cloth, soapy water, fine-grit sandpaper, petroleum jelly (for adhesive removal) |
| Fastening Tools | Hammer, screwdriver, drill/driver, finishing nails, heavy-duty staples |
| Materials | Chosen weatherstripping (foam, V-strip, etc.), door sweep, threshold (if needed) |
| Optional | Awl or ice pick (for pilot holes), toothpicks and wood glue (for stripped screw holes) |
With these tools and materials ready, you’ll be well-equipped to install weatherstripping that lasts.
How to Install Weatherstripping: Step-by-Step Instructions
Installing weatherstripping is a simple yet effective way to improve energy efficiency. By following a step-by-step approach, you can create a tight seal that can help reduce heating and cooling costs by up to 20%.
Preparing the Door and Frame
Begin by inspecting the door frame for any cracks, rot, or structural issues. These problems can interfere with achieving a proper seal, so address them before proceeding. Check the door’s alignment by lifting it from the knob – if it shifts, tighten the screws on the hinges to ensure it sits squarely in the frame.
Remove any old weatherstripping carefully using a utility knife or a 5-in-1 tool. Be cautious to avoid damaging the underlying surface. Next, clean the door jamb and frame with soapy water to eliminate dirt and adhesive residue. A clean surface is essential for ensuring the new weatherstripping adheres properly.
Accurate measurements are crucial for achieving an airtight seal. Measure the top and sides of the door frame, as well as the gap between the door and the jamb when closed. Double-check your measurements before cutting to avoid mistakes.
| Preparation Step | Tools Needed | Purpose |
|---|---|---|
| Inspection | Flashlight, Screwdriver | Check for rot or loose hinges that affect alignment |
| Removal | Utility knife, 5-in-1 tool | Remove old weatherstripping and adhesive |
| Cleaning | Sponge, mild cleaner, sandpaper | Create a smooth surface for better adhesion |
| Measuring | Tape measure, Pencil | Ensure precise cuts for proper fitting |
Once the frame is clean and measured, you’re ready to install the new weatherstripping.
Installing Weatherstripping on Sides and Top
Cut the weatherstripping to match your measurements. Use scissors for foam or felt materials, and a utility knife for vinyl. Before applying, hold the pieces against the frame to ensure they fit properly. It’s best to attach the weatherstripping to the door jamb rather than the door itself for added durability.
For adhesive-backed strips, peel off the backing in small sections, starting from a top corner and working downward. Press firmly along the length of the strip, but avoid stretching it – stretched material can shrink over time, creating gaps. If needed, reinforce the strips with staples or tacking nails for extra security.
After installing the weatherstripping, perform a paper test: close the door on a piece of paper and try to pull it out. If it slides out easily, the seal needs adjustment. Another check is to close the door and look for light seeping through the edges – any visible light indicates gaps that may require additional sealing or caulk.
Once the sides and top are sealed, move on to the bottom of the door to complete the barrier.
Installing Door Sweeps and Thresholds
Measure the width of your door and the height of the gap between the door bottom and the threshold at multiple points to find the largest gap. Use a hacksaw for rigid materials like metal or plastic, and scissors or a utility knife for flexible materials.
The installation method varies depending on the type of door sweep:
- Slide-on sweeps: Remove the old sweep and slide the new one into the tracks. A little liquid soap can help ease the process.
- Wrap-around sweeps: Fit these over the bottom of the door, ensuring the sweep overlaps the sill by about 1/8 inch for a tight seal.
- Screw-on sweeps: Drill pilot holes before attaching screws to prevent splitting the wood.
For thresholds, position the seal behind the door so it presses against the back when closed. This placement prevents water from running down the door face and leaking inside. Notch the threshold as needed to eliminate any gaps that might allow air or water to pass through.
Test your work with the dollar bill test: place a dollar bill on the threshold and close the door. You should feel some resistance when pulling it out, but it shouldn’t be stuck or slide out too easily.
Maintaining Your Weatherstripping
Once your weatherstripping is installed, keeping it in good shape is essential to ensure it continues to perform effectively. Regular maintenance not only extends the life of the seals but also helps cut down on energy costs. In fact, maintaining weatherstripping is just as important as installing it when it comes to long-term energy savings. Make it a habit to inspect your weatherstripping at least once a year – ideally before winter sets in or after any severe storms. This simple step can help keep your home comfortable and your utility bills manageable.
Cleaning is also key. Use mild soap and water to clean both the strips and the door frames, as dirt and grime can degrade the material over time. Stay away from harsh chemicals or abrasive cleaners, which can damage foam, rubber, or vinyl. For an extra layer of protection, consider applying a silicone spray lubricant. This reduces friction and helps the weatherstripping last longer.
When to Inspect and Replace Weatherstripping
Keep an eye out for signs of wear and tear, such as cracks, rips, dents, or fraying. Door sweeps may lose bristles or become bent, while foam strips can get permanently compressed and lose their effectiveness. The lifespan of weatherstripping varies by material. Foam tape, for instance, is affordable but fragile and usually needs replacing every few years. On the other hand, tension seals and tubular rubber options are more durable, though they come with a higher upfront cost. High-traffic doors tend to wear out faster, so they may need more frequent attention. Pairing regular inspections with routine cleaning helps ensure your weatherstripping stays in top shape.
Cleaning and Care Tips
In addition to annual checks, regular cleaning plays a big role in extending the life of your weatherstripping. Periodic tests can help confirm that the seals are still effective. If you notice any sections that are compressed or damaged, replace them immediately. Before installing new weatherstripping, make sure the door frame is completely clean and dry, and remove any leftover adhesive from the old strips. This prep work ensures the new weatherstripping adheres properly and performs as it should.
Wrapping It Up
After diving into the different types, installation methods, and upkeep tips, one thing is clear: weatherstripping is a smart home upgrade. This budget-friendly solution creates a tight seal around doors, cutting down on air leaks and easing the load on your HVAC system – especially crucial in South Carolina’s hot, humid climate. Paired with proper insulation, good weatherstripping can make a noticeable dent in energy bills and keep your home more comfortable.
Picking the right material is where it all starts. Foam tape is great for small gaps in low-traffic spots, while silicone or EPDM rubber holds up well under South Carolina’s tough conditions. V-strips are perfect for an almost invisible seal on door sides and tops, and door sweeps take care of those pesky gaps along the bottom.
Installing it yourself? No problem. Just measure carefully, clean the surfaces, and apply the strips evenly for the best results. Once it’s in place, test the door to make sure the seal works smoothly without getting in the way.
Keeping weatherstripping in good shape is just as important as installing it. Check the seals every year – especially before winter hits – and clean them with mild soap and water to keep them in top form. If you spot cracks, wear, or damage, swap out those sections to keep your energy savings intact.
"Investing in quality weatherstripping is a small step that can lead to significant improvements in your home’s comfort and energy efficiency." – Anthony Rider
For South Carolina homeowners, this upgrade delivers comfort, energy savings, and added protection. If you’re looking for expert advice or premium products, the team at Icon Window & Door is ready to help you make it happen.
FAQs
How do I find where my door is leaking air?
To find air leaks around your door, start by inspecting the weatherstripping and seals for any signs of wear, like flattening or visible gaps. You can also use your hand to feel for drafts or hold a tissue near the edges – if it moves, there’s likely a leak. Another method is to turn on a porch light inside your home at night and step outside. If you see light shining through, those are spots where air is sneaking in.
Which weatherstripping works best for high humidity and coastal wind?
Silicone weatherstripping works well in areas with high humidity and strong coastal winds. It provides flexibility, long-lasting durability, and dependable performance year-round.
When should I replace weatherstripping instead of adjusting the door?
If your weatherstripping is worn, damaged, or failing to seal gaps effectively, it’s time to replace it. Look out for signs like drafts, rising energy bills, increased noise, moisture issues, pests getting in, or visible wear and tear. Cracks, tears, or poor adhesion are clear indicators that replacement is necessary to keep your home comfortable and energy-efficient.